Digitizing Entire Collections
Digitizing Entire Collections AikensBIntroduction
This document outlines the workflow and provides guidelines for Archives of American Art (AAA) staff preparing, scanning, and reviewing fully digitized collections created specifically for the Archives’ large scale digitization program. AAA’s approach to digitizing entire collections focuses on facilitating online reproduction and access, and the primary objective is to produce digital images that are reasonable reproductions, without enhancements.
These guidelines do not address all of AAA’s digitization projects and workflows. Specifically, they do not address the digitization of our audio visual materials and only provide a summary of the workflow for item-level scanning. Although all digital content is stored in the same database, the workflows, database tables, file naming, and file directories are different.
The guidelines address only archival processing-related workflows and procedures that are directly related to AAA’s large scale digitization projects. They do not cover general AAA archival processing guidelines and procedures, nor AAA’s EAD Encoding Guidelines–these activities are covered in other AAA procedural documents and manuals.
Moreover, these guidelines are not meant to be a comprehensive and technical manual for digitizing historical archival items or collections, nor are they appropriate guidelines for preservation digital reformatting. There are many technical books, guidelines, and papers that have been written on this subject.
Digitizing Entire Collections: Chapter 1, Background
Digitizing Entire Collections: Chapter 1, Background AikensBAAA’s large scale collection-level digitization initiative is a system and infrastructure that fully integrates the descriptive metadata found in EAD (Encoded Archival Description) finding aids with corresponding digital content at the collection level. The structured data inherent to EAD finding aids provides the only descriptive metadata for the digitized collection, and also serves as the contextual format for online navigation and access. The resulting online public view is a presentation that provides crucial context to the users and mimics the collection’s archival organization and arrangement as found in a finding aid - providing researchers with a virtual reading room experience.
The underlying database incorporates powerful programming and web interfaces that support and integrate internal archival and scanning workflows necessary for a large-scale digitization program. It is also a system of workflows, techniques, and equipment planned specifically to speed digitization output by focusing on increasing access and re-purposing archival resources, workflows, and descriptive information as much as possible. While we try to meet minimum levels of capture, the entire concept focuses on access.
The system does not rely on item-level metadata for digital content. Rather, the database captures all of the descriptive elements of the EAD XML formatted finding aid created by the processing archivist. The folder headings and other descriptive elements found in the finding aid serve as the only descriptive metadata for the digitized collection. The structure of the finding aid also serves as an easy to use online navigation tool.
It is important to stress that the folder level metadata is created only once–in the EAD finding aid. We do not “catalog” folders or folder titles as a separate workflow.
Although first realized in 2005 and fully mature by 2010, the earliest seeds of the concept can be traced back to AAA’s history of in-house microfilming. Our founding mission was to build a repository of microfilmed archival collections that would increase access to previously hidden resources that documented the history of art in America. Many of the workflows originally built to support microfilming have been “repurposed” to support large-scale digitization.
Digitizing Entire Collections: Chapter 2, Technical Overview
Digitizing Entire Collections: Chapter 2, Technical Overview AikensBPage Contents
Technical Equipment
Technical Workflow
AAA has built a digital content management database that serves as the underlying infrastructure for our large scale digitization initiatives, most often referred to as the DCD (Digital Collections Database). The DCD holds much more than the tables for collections digitization. AAA’s DCD contains collection records downloaded from our MARC catalog records in SIRIS; all EAD finding aids; and all digital content and metadata records generated for researcher requests, outside publications, AAA’s Journal and exhibitions; and AV reformatting. The DCD also contains a comprehensive collections-wide processing survey table; the accessioning table; and an automated removal notices workflow. It is capable of producing numerous reports on digitization and other archival activities.
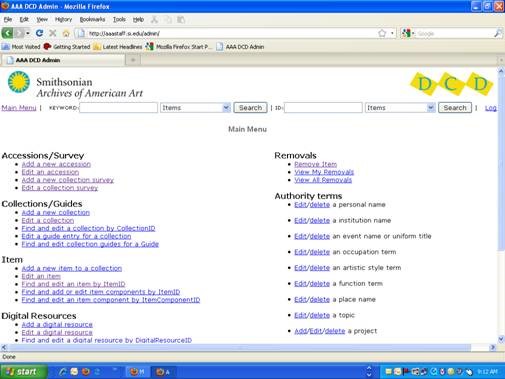
An MS SQL Server database stores all of the data tables and is driven by Adobe ColdFusion programming, with some Java programming. The programming is focused on functions and workflows, such as EAD ingestion, PDF creation, generation of a file directory, creation of multiple sized image derivatives, watermarking, and collection deployment to the web.
Equipment
In 2010, AAA purchased two Digital Transitions RG3040 reprographic camera systems. At that time, AAA began scanning entire collections in color at 600 ppi as the default. Some oversized materials must be scanned at 300 ppi color, or scanned at 600 ppi color and stitched together post processing.
This equipment does not capture a TIFF file. Rather, an .EIP file is created that contains both the RAW camera data file combined with the technical metadata in XML format. Technical metadata is automatically embedded into the file with the equipment’s built-in software and will provide the following information:
File name
File format
Dimensions
Date of capture
Camera serial number and firmware
White balance
Make & model of camera
Capture Software
Shutter speed
ISO speed rating
Files are saved according to file directories that match the container listing in the finding aid.

Workflow
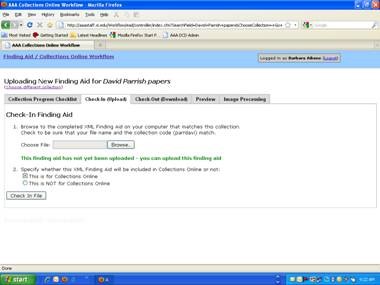
The EAD finding aid created by the processing archivist serves as the only descriptive metadata for the digital files associated with each fully digitized collection. As shown in the diagram above, the archivist uploads her/his EAD finding aid XML file into the DCD via the Collections Online workflow web form found on AAA’s intranet page. All of AAA’s collections are represented in the DCD with a collection-level description ingested from a nightly upload of MARC records from the library catalog (SIRIS), so that the archivist simply selects the correct collection from a drop down menu. Once the finding aid is uploaded, the archivist will select whether the finding aid is for a digitized collection or not. Remember, all of AAA’s finding aids are stored in the DCD.
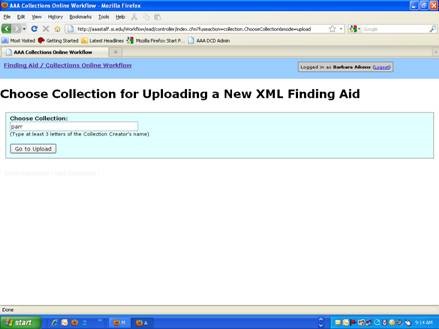
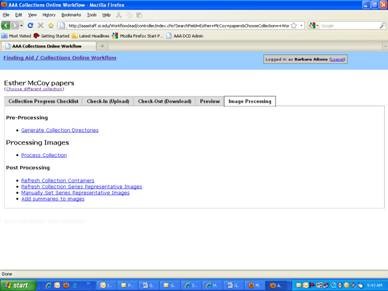
Once a finding aid is uploaded for a collection that will be fully digitized, a file directory is automatically generated from the container listing extracted from the finding aid and loaded onto the scanning technician’s personal computer. Because the file directory is derived from the finding aid, it mirrors both the intellectual and actual physical arrangement of the collection. The scanning technician simply scans each folder in each box and saves the resulting digital files in the directory folder that matches the numbers on the actual folder in the box, which were added by the archivist during processing. File naming is driven by simplified by the alpha-based collection code assigned to each collection combined with a sequential, numerical value assigned by the capture software, for example, jacqselig00001.eip. At this time, the box number is not attached to the file name.
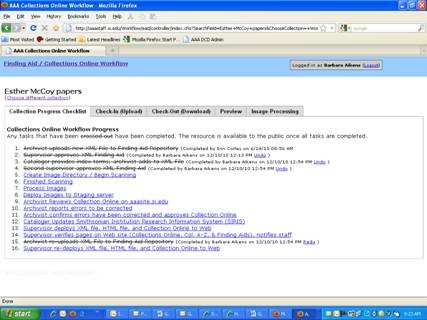
As outlined in the figure above, steps #1-4 are archival processing workflows appropriate for all archival finding aids. The archivist uploads a new finding aid, the supervisor/chief of collections processing reviews and approves the finding aid, the cataloger provides the index terms, the archivist adds the index terms to the finding aid, and the second supervisor approves the final draft (the second supervisor is usually the same as the first).
Steps #5-8 are completed by the digital assets manager. The image directory is created and the collection is ready to be scanned. The scanning technician completes the scanning and the images are processed and deployed to the staging server by the digital assets manager.
Steps #9-11 are completed by the processing archivist after being notified by the digital assets manager. The archivist reviews the site, reports errors, and confirms errors have been corrected. She then notifies the cataloger that the collection is ready for final cataloging and notifies the chief of collections processing (supervisor) that the collection is ready to be deployed to the public website. (See Section V for detailed instruction on the review process.)
Step #12 is completed by the cataloger but checked off the list by the processing archivist prior to notifying the supervisor that the collection is ready to be deployed to the public website.
Steps #13-14 are completed by the chief of collections processing 1-2 days after the final cataloging is complete, allowing some time for the updated catalog record in SIRIS to import into the DCD and display on the public site.
When Step #13 is checked off the list, the htm file is automatically deployed to AAA’s public website. At the same time, the PDF file and the XML file are deployed to the appropriate folders in the Smithsonian’s TeamSite deployment interface. From there, the files must be manually deployed to AAA’s website. The PDF will be visible on the same web page as the htm file, but the XML master file remains in a folder on the server to be harvested by OCLC/RLG for its Archive Grid website/database. Steps #15-16 simply allow the file to be edited, re-uploaded, and redeployed.
Steps #15-16 support subsequent changes to the EAD finding aid and its redeployment.
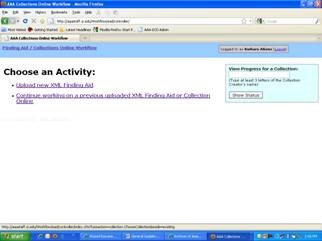
To check out an XML EAD finding aid from the DCD for editing, choose the second bullet in the figure above. Then select the collection and click on the Work with Collection button. The drop down list for this workflow contains only XML documents previously uploaded.
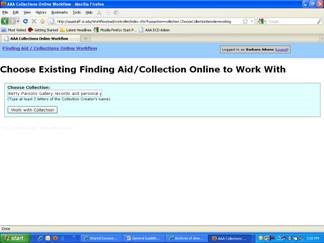
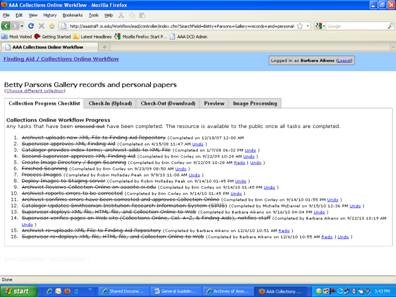
From this screen, check on the Check-Out (Download) tab to check out the XML file. While you have the file “checked out”, no one else has access to it. Click on Preview if you only want to download a copy but leave the master XML in the DCD. If you check on the Check Out tab, a Pop Up Box will appear and you want to save the file, so simply click on OK.
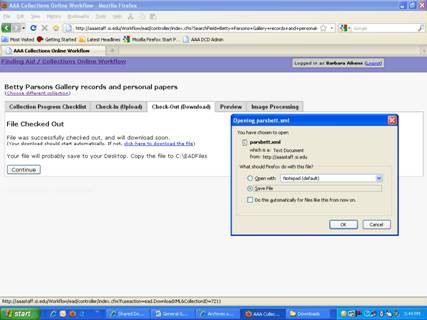
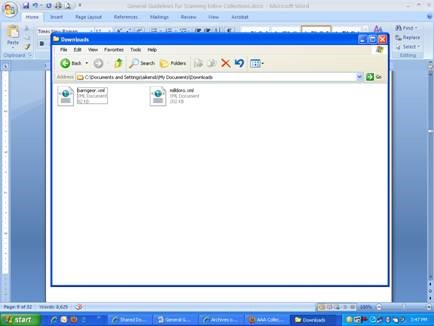
There is a default setting for where the file is downloaded. Usually, it downloads to the My Documents folder on your PC desktop, in the Downloads folder. However, it can vary from PC to PC and might download on your desktop. From there, CUT the file and paste it in your C/eadcb/eadfiles folder for editing in NoteTab.
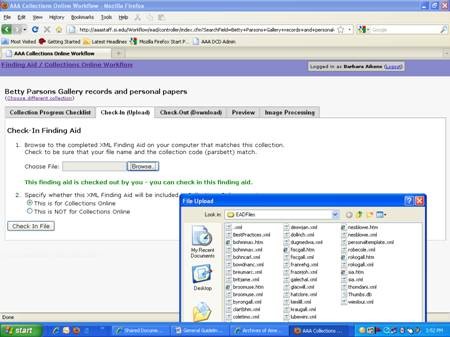
When you have finished, go back to the Workflow and Check-In (Upload) the file. Use the Browse tab to locate the file directory on your PC where the file is currently stored. Click on the correct file name and then click on the Check In (Upload) button. A special screen will pop up to show you the progress of the upload–larger more detailed files can take some time to upload.
Digitizing Entire Collections: Chapter 3, For Processing Archivists
Digitizing Entire Collections: Chapter 3, For Processing Archivists AikensBCollections that are scheduled to be scanned in their entirety must be processed to a more detailed level than other collections, particularly the level of descriptive detail provided in the finding aid, especially on the folder level. The processing archivist is preparing the primary online access and navigation tool for the scanned collection via the arrangement of the collection and the EAD finding aid.
The processing archivist must also prepare a set of scanning instructions for the scanning technician, complete the Scanning Information Worksheet, meet with the scanning technician, and review and approve the Collection Online site for the collection. The overall goal of the Collections Online workflow is to repurpose traditional archival methodologies and EAD finding aids for large-scale digitization.
Page Contents
Creating and Filing Instructions for the Scanning Technician
Flagging Items for Scanning by Another Technician
Integrating Existing High-Resolution Scans
Notation in EAD Finding Aids About Materials Scanned or Not Scanned
Letter Collections and Other Small Collections
Oversized References in Folder Headings
Deciding what not to scan
If a collection is prioritized and scheduled for scanning, most of the material within the collection should be scanned. The decision not to scan materials should NOT be made on an item by item basis, but rather on the folder and/or series/subseries level. For the most part, it is simply easier to scan the materials than to flag and make notes for not scanning. However, not everything can or should be scanned in a collection.
As the processing archivist, you will use your archival appraisal skills to determine series and folders that should not be scanned due to minimal research value, privacy and ethical issues, inappropriate content or images, and copyright concerns.
If significant portions of a collection will not be scanned, this decision will have to be approved by the Chief of Collections Processing. In some cases, a decision not to scan significant portions may have been made before processing begins.
The processing archivist should look at the collection materials for potential copyright and trademark issues, as well as inappropriate or sensitive material. It is not the archivist’s job to determine who owns copyright, but simply to be aware of the issue and discuss it with the Chief of Collections Processing and Information Resources Manager if anything might be highly questionable–such as photographs stamped with the photographer’s name and a statement indicating the photograph can not be reproduced.
For most collections, the donor is also the creator and has signed over their literary rights to AAA for scholarship. However, it is the rare collection where the donor/creator is the sole copyright owner. Generally, AAA takes an overall high risk for copyright issues in its approach to support access and scholarly studies. Thus, we routinely digitize materials for which we do not own copyright and have not sought permission. Exceptions generally include photographs of works of art that are not annotated, the entirety of published materials, and photographs clearly stamped with restrictions on reproduction by the photographer.
AAA does not want to scan and make inappropriate materials available online, such as pornography and lascivious materials that are clearly not source materials for the artist or that lend nothing to the understanding of the life of the creator. However, this is often not always a clear judgment. Your archival appraisal skills should help you determine which of these types of materials support an understanding of the creator’s life or work and should be scanned, and which of those may support a lesser understanding of the creator’s life and not scanned, but merely noted in the finding aid. Remember, you are not disposing of the material if it is not scanned; it is fully accessible to researchers via the finding aid. You should consult with your supervisor or another member of the “Terra Team” when these issues arise. Also remember that we are not trying to censor our materials or access to our materials. However, we are a federal institution that is accountable to the public.
Be aware of privacy legal issues. Generally avoid having mental or other health records, personnel files, personal tax records, or banking records scanned. Do not have documents that include payroll or social security numbers digitized.
Large volumes of routine non-archival printed materials, such as clippings, auction catalogs, exhibition catalogs, etc. might be passed over for scanning or selectively scanned. Do not have entire published books digitized. Rather, you may flag the cover, title page, and relevant pages within for scanning.
DO have rare printed materials scanned, such as rare unpublished catalogs and announcements, printed manuscripts, etc.
In summary, most often you will review the following and possibly flag for not scanning.
- Duplicates.
- Large quantities of news clippings and magazine clippings, entire newspapers.
- Photographs of works of art that are not annotated with research notes.
- Contemporary published books and contemporary exhibition catalogs (those that may be readily available in a library). Most likely scan the cover, title page, any relevant pages within.
- Pornography and lascivious materials.
- Some nude photographs, including ALL nude photographs of children and nude photographs of any person that has not signed the deed of gift on file granting AAA literary rights. Review any nude photographs of the creator to ensure that the image is not pornographic or lascivious. Consult with supervisor if you have questions.
- Research files composed primarily of photocopies, including photocopies of original material from other repositories.
- Multiple versions of edited manuscripts, unless these versions are highly annotated or significantly different from the final manuscript version.
- Sensitive financial, personal, and legal materials, such as tax returns, banking records, personnel records, medical records, and any records with social security numbers–particularly if the information is relatively current or belongs to someone other than the person who signed the deed.
- Routine materials, such as equipment manuals and utility bills. Review with supervisor whether these may be disposed of.
- Slides, negatives, and transparencies. If these are significant enough to scan, please talk to the digital assets manager for special arrangements
- Materials that are too large or bulky to be scanned.
- Materials that are too fragile to be scanned.
- Materials having little or no research value. Review with supervisor whether these may be disposed of.
Creating and Filing Instructions for the Scanning Technician
It is the processing archivist’s responsibility to prepare the collection for scanning by writing very clear and concise instructions and flags for the scanning technician, at the folder and item level, and filing these notes within the collection. Instructions and notes filed within the collection should be created on brightly colored paper, such as pink or yellow or lime green. They do not have to be typed, just legible.
AAA increasingly uses vendors for scanning. It is critical that all scanning notes and instructions be very specific and clearly written.
Once the collection has been scanned, review the contents and remove the instructions if the scanning technician did not remove.
- Clearly flag materials that are not to be scanned, including duplicates. Don’t make the scanning technician identify duplicates–this is your job. If there is a large amount of material, mark the beginning and end clearly. In some cases, it is helpful to wrap a piece of paper around the folders or items not to be scanned.
- Write clear instructions about what pages to scan in publications, such as “Scan cover, title page, and pages 15-18. If no written directions are included, the scanning technician will most likely scan the entire publication.
- It is helpful to flag blank pages in bound volumes, so that the scanning technician does not have to go through each page looking for text or writing. This is especially critical for outside vendors.
- Flag particularly fragile documents, noting either to handle with care or not to scan.
- Write clear instructions and that pinpoint where an oversized item/s is located (container #) and file in the folder. Clearly mark the oversized material to be scanned in the oversized container, with a reference to the specific box and folder from which it was separated and should be integrated. See instructions below for referencing oversized materials in the EAD finding aid and AAA’s Guidelines for Creating Finding Aids.
- Notify the digital assets manager that the collection is ready to be scanned and the file directory can be uploaded. Let her know the physical location of the collection–all pieces.
- Before turning the collection over to be scanned, fill out the Scanning Information Worksheet and meet with the scanning technician and digital assets manager to discuss any issues and/or concerns.
- After scanning is complete, the digital assets manager will notify you when the images are deployed to the internal workflow, so that you can complete the final online review and checklist worksheet. (See Section VI. Reviewing and Finalizing Site)
Flagging Items for Scanning by another Technician
Clearly flag items that need to be scanned by Marv and note the respective folders and boxes on the Scanning Information Worksheet. Typically, this includes significant negatives for which there are no corresponding prints, transparencies, and slides. List the box and folder numbers on the Scanning Worksheet.
When the items have been clearly flagged, the scanning technician will simply skip this material, keeping the file structure intact. Once the collection has been completely scanned for CO, the scanning technician or digital assets manager will turn the relevant box/es and the portable drive over to Marv. Marv will scan the designated items and “drop” the images into the file structure.
Integrating Existing High-resolution Scans
Most often, the scanning technician will just scan the entire collection, including any single items scanned at an earlier time by Marv. This is fine, but there may be that rare item that you think should be inserted. Most often, this would only be appropriate for particularly rare or fragile items that should not be handled again, items that were oversized and have already been “stitched” together, and items that are out on loan or exhibition when the collection is being scanned. You can check the DCD for any existing high-res scans that might be inserted. Clearly flag the folder and item with an instruction to the scanning technician that an existing scan from the DCD should be inserted and not to scan. Also, make a note on the Scanning Worksheet.
Removal Notices
When you encounter a current removal notice with an attached photocopy, write an instruction for the scanning technician to scan the front of the removal notice. The images generated for this item(s) will be inserted prior to image processing.
For missing items with old Removal Notices, make sure that you instruct the scanning technician to not scan the removal notice or leave a place holder–most likely it will not turn up anytime soon. Also notify the Registrar if you encounter this situation.
Removal Notices for both situations (current and missing) should be noted on the Scanning Worksheet.
Notations in EAD Finding Aids About Materials Scanned or Not Scanned
The collection-level Alternate Formats Note <altformsavail> in the EAD finding aid includes a statement about the collection being available in digital format, but should also include a brief sentence about the types of materials generally not scanned. For example:
The bulk of the collection was digitized in 2008 and is available via the Archives of American Art’s website. Blank pages, blank versos of photographs, photographs of artwork, duplicates, as well as select financial documents have not been scanned. In most cases, only the cover, title page, and individual relevant pages have been scanned from published materials.
At each series and subseries level, include a sentence in a separate <arrangement>**note specifying whether the series has been scanned in its entirety, partially scanned, or not scanned. Specify which materials have not been scanned if the series/subseries has been partially scanned. For example:
- <scopecontent><p>narrative descriptive text</p></scopecontent>
- <arrangement> <p> Personal papers are arranged in alphabetical order according to format. This series is partially scanned; early academic records, tax records, duplicates, and poems written by others have not been scanned. </p><arrangement/
- <scopecontent><p>narrative descriptive text</p></scopecontent>
- <arrangement> <p>This series has been scanned in its entirety.</p><arrangement/>
- <scopecontent><p>narrative descriptive text</p></scopecontent>
- <arrangement> <p>This series has not been scanned.</p><arrangement/>
- ** Using the <arrangement> note for this information is not fully EAD-compliant and does not meet national best practices; we will soon change our practices and start using <altformsavail> notes at component levels to note scanned status.
In the EAD finding aid, also make a notation “partially scanned” at the folder level in the <physdesc> tag. It may be combined with other <physdesc> information, separated by semicolon. DO NOT use a “partially scanned” notation when you are referring to duplicate materials. In 2011, AAA deprecated the use of a “not scanned” notation for folders not being scanned in their entirety.
For example:
- <c02><did>
- <container type="box">1</container>
- <container type="folder">1</container>
- <unittitle> Newsclippings, <unitdate>1920-1930 </unitdate></unittitle>
- <physdesc>(2 folders; partially scanned) </physdesc>
- </did></c02>
- <c02><did>
- <container type="box">1</container>
- <container type="folder">2</container>
- <unittitle> Newsclippings, <unitdate>1936-1940 </unitdate></unittitle>
- <physdesc>(2 folders; oversized items in Box 14; partially scanned)
- </physdesc>
- </did></c02>
Arrangement and Description
Correspondence should be arranged in alphabetical order by name of correspondent when possible. This arrangement provides access points without the need to create a separate index, which is not accessible from the online image viewer.
If you must arrange correspondence in chronological order because it is too time consuming to arrange alphabetically, you must have your supervisor’s approval. If approved, do not group a large number of folders together in one folder heading. Remember, the folder title is a link to the contents of each folder, and it is too confusing to link to a large number of folders with the exact same heading. The breaks should fall where materials bulk the most or at regular intervals.
- <c02><did>
- <container type="box">1</container>
- <container type="folder">1</container>
- <unittitle>Letters, <unitdate>1942</unitdate></unittitle>
- <physdesc></physdesc>
- </did></c02>
- <c02><did>
- <container type="box">1</container>
- <container type="folder">2-3</container>
- <unittitle>Letters, <unitdate>1943-1944</unitdate></unittitle>
- <physdesc>(2 folders)</physdesc>
- </did></c02>
Letter Collections and other small collections
When describing a collection that is very small, less than 0.2 linear feet, comprised primarily of letters, please provide the number of letters/documents within the collection in the abstract note and scope and content note. You may also choose to create a folder title for each item, but only if the collection is fewer than 20 items.
Oversized References in Folder Headings
References to oversized materials are made in the <physdesc> tag.
At the folder heading where items have been removed, use the following language, as appropriate, in parenthesis.
<physdesc>(Oversized items housed in Box ## or OV##)</physdesc>
At the folder heading where the oversized item/s is physically housed, use the following language in parenthesis.
<physdesc> (Oversized items scanned with Box ##, F##) </physdesc>
At the folder heading where an entire folder has been removed and filed in an oversized box or oversized folder, and you have created a dummy folder, use the following language, as appropriate, in parenthesis.
<physdesc>(Oversized folder housed in Box ## or OV##)</physdesc>
At the folder heading where the entire oversized folder is now physically housed, use the following language in parenthesis.
<physdesc> (Oversized folder scanned with Box ##, F##) </physdesc>
When combining multiple items of information in a <physdesc>, the order of elements should be 1) number of folders if more than one, 2) oversized references if any, and 3) any notes about not scanned or partially scanned. The elements should be enclosed in only one set of parenthesis, separated by semicolons.
Oversized references in folder headings for materials not scanned do not include the word “scanned” when referencing back to other boxes. Simply state <physdesc> (Oversized items from Box #, F#) </physdesc>.
Digitizing Entire Collections: Chapter 4, For Scanning Technicians
Digitizing Entire Collections: Chapter 4, For Scanning Technicians AikensBPage Contents
Characteristics of Archival Collections
Preparing and Reviewing Collections
Handling
Special Problems
Characteristics of Archival Collections
Archival and manuscript collections usually consist of a full range of formats and sizes, such as typed and handwritten correspondence, newspaper clippings, scrapbooks, diaries, original and copy print photographs, photograph albums, pencil and watercolor sketches, prints, sketchbooks, rare and contemporary printed exhibition catalogs, annotated catalogs and books, exhibition announcements, calling cards, printed illustrations, journals, address books, calendars, account books, ledgers, posters, maps, etc. Some of our collections even contain fabric samples! The list is seemingly endless.
AAA scanning technicians must be adept at identifying, handling, and successfully scanning a multitude of widely varying types and sizes of materials, usually filed side by side within each folder.
The task is further complicated by the physical characteristics of the material itself, such as brittle and crumbling newsprint or letters, damaged spines or spines that could be damaged with handling, onionskin letters, onionskin letterpress books, documents with heavy ink bleed-through, scrapbooks with multiple types of documents layered on one page, scrapbooks with items that have fallen off or are loose, oversized material, and extremely fragile documents, artwork, and photographs.
Your goal is to produce digital images that are reasonable reproductions, without enhancements.
The entire document must be captured in each image, including all edges. Images captured on the Zeutschel equipment may be cropped to ¼ inch or a thin band surrounding all sides of the document. Images captured with the Digital Transitions equipment should contain a Golden Thread 9 ¼” or 18 ¼” target.
Preparing and Reviewing Collections
The processing archivist prepares the collection for scanning, creates the finding aid which serves as the descriptive metadata, and reviews and approves the final online site for the collection after scanning. She/He is the most familiar with the materials and formats unique to the collection.
The processing archivist will have completed a Scanning Information Worksheet (see Appendix A: Scanning Workflow Forms [PDF]) that notes special scanning instructions and issues throughout the collection, and will schedule a meeting with the scanning technician and digital assets manager.
The processing archivist will also have filed special scanning instructions throughout the collection. Typical scanning instructions might include notes that 1) clearly identify materials not to be scanned either because of limited research value, privacy issues, inappropriateness, size, or because they are duplicates or blank pages, 2) direct the technician to oversized storage containers for oversized materials that must be scanned in sequence, 3) identify special instructions regarding partially scanned items and folders, and 4) clearly identify materials that should be scanned by another scanning technician due to format. These notes are in addition to our regular scanning directives for technicians outlined below.
In the past, there were special directions about what materials should be scanned in color within the collection. However, in 2010, AAA purchased new equipment and color scanning is now the default mode for all scanning. We may still outsource grayscale scanning for some collections; this will be determined on a collection by collection basis.
The first folder (B 1.1) of the first box of each new collection to be scanned will contain the Scanning Information Worksheet. The worksheet provides the name of the Processing Archivist and a copy of the finding aid container listing (box #s, folder #s, and folder titles). The Archivist should have noted any special materials or special handling issues on the Worksheet, in addition to the instructions that may be filed throughout the collection. The Scanning Technician should follow and consult the printed container listing from the finding aid when scanning–it is a good way to check the progress of the job and make sure that folders have not been skipped, etc.
The scanning technician, processing archivist, and digital assets manager will have a short meeting prior to each new assignment and consult throughout the assignment–clarifying instructions and discussing concerns about legibility, fragility, condition, or size.
The Scanning Technician should never hesitate to consult with the Processing Archivist during the course of scanning a collection.
After the collection has been scanned and the images processed, Part B of the Scanning Information Worksheet is to be completed by the Scanning Technician and returned to the archivist. The worksheet includes a section for the technician to note individual images or groups of materials that may not be clear or fully legible–despite best efforts.
The Scanning Technician will also complete the Digitization Internal Note (see Part C) of the Scanning Form when the job is complete.
Handling
Handling AAA’s historical collections with care should be the Scanning Technicians first priority. Capturing the best possible image is second. There will be problematic materials which could include fragile scrapbooks with tight bindings; crumbling newsprint; newsprint in a very small font size; bound volumes; letterpress books; poor and low contrast materials; bleed through; onionskin paper; fragile and brittle materials; oversized materials; photographic materials (usually we do not scan negatives and slides for Collections Online); art work, such as drawings, sketches, sketchbooks, prints, etc.
Never fold, crease, apply undue pressure, or roughly manipulate any documents in order to capture a better image.
Special Problems
Mutilated, torn, or holes in document
- Use a black background to ensure that the hole or damaged area is clearly visible. The goal in scanning historical documents is to present the document as close to the original as possible.
Show Through/Bleed Through
- Use a white piece of paper to back the original.
Onionskin or Transparent Paper and Onionskin Letter Press Books
- Use a white or cream piece of paper to back the original. For Letter Press Books, use the blank paper for each leaf.
Black Documents
- Use a white or cream piece of paper to back the original to provide a contrast between the scanning table and the document’s edges.
Poor Contrast
- Contrast can be adjusted somewhat during capture and through post processing. The scanning technician should adjust if possible. If this is not possible, then the scanning technician will bring this to the attention of both the processing archivist and the Digital Assets Manager. If the image is totally illegible, please note it on the worksheet for review.
Bound Materials
- Bound materials take many different forms in manuscript collections–diaries, sketchbooks, books, catalogs, ledgers, letterpress books, scrapbooks, etc. Some are thick with spines, and others have sewn bindings.
- Use particular care with most bound materials, taking advantage of the various book cradles, particularly for larger volumes and fragile spines. You may also use non-glare glass or plexiglass to help flatten the material with care. For small thin volumes, often the glass is enough. However, when flattening any bound volumes, handle lightly, use care and do not press too hard. Sometimes it is difficult to get a good image of the inside margin area without flattening, however documents should never be creased or forced with your hand or other device.
- Scan bound volumes opened when the size is less than 8 x 11 inches or when the depth/binding interferes with a good image when open. Otherwise scan each page of the opened volume separately. Scan the front cover and back cover from the closed volume. Do not scan blank pages.
- Some bound volumes, such as ledgers or sales records, have name indexes either in the front or back of the book. The index may be separated by an expanse of blank pages, so be careful not to overlook handwriting in the front or back of the volume, even if the archivist did not note the blank pages.
Scrapbooks and other Layered Documents
- Scrapbooks should be scanned much the same as any bound volume, with care, using a book cradle if needed and glass.
- Commonly, a scrapbook will have multiple pieces taped or glued on one page that partially obscure other pieces, as well as multi-page brochures and pamphlets glued to the scrapbook page. First, take one image of the scrapbook page as found. Then take as many multiple images of the same page as needed to capture all of the contents of the individual components of the page, reading from left to right and top to bottom. Take images of all of the pages of brochures, catalogs, or pamphlets affixed to the scrapbook page.
- Sometimes items that were once affixed to the scrapbook page become detached. You can often determine where it’s original placement was and if you can, scan the page with the detached item in its original “place” on the page. If it is a multi-page item, scan as outlined in #2 above.
- Individual items may be loose and filed within the pages of a scrapbook–they were never attached - scan those items individually after you have scanned the entire page and all of its components.
- Other bound materials, such as diaries, ledgers, account books, notebooks, address books, etc. sometimes contain documents or bits of paper glued or taped to the pages. Never force the removal of taped or glued items. There may even be documents filed within envelopes taped or glued to the page. Again, it is important to take an image of the page as it appears in its original format, then as many shots as needed to capture all of the documents.
- Loose items are commonly inserted within bound materials as well, and should be scanned separately and immediately following the page where they were inserted. These are slightly different than items that have become detached from a scrapbook–it is not necessary to capture the “look” of the insert on the page.
Rotated Handwriting and Annotations
- Nineteenth-century letters often have handwriting in varied rotations on one page, and other materials may have annotations written in margins that are rotated from the rest of the writing or printed word. Only one image is necessary.
Multi-Page Folded Handwritten Letters
- Nineteenth-century letters were often written on folded stationary and when the document is unfolded, it is sometimes difficult to determine the proper sequence of the pages. Usually you can tell by the salutation (Dear…) or the date of the letter, which often is written on the first page. Regardless, do you best to scan the letter in reading order if possible. If it is difficult to determine the reading sequence, simply scan in physical order by first scanning the top page as one image, then open the document and capture the next two pages (or more) “open face,” and finish with one shot of the back or last page. Consult with the processing archivist for help in determining the best scanning sequence.
Glued Items on Letters or Other Material
- You will occasionally find letters or other documents that have other documents or pieces of paper glued to them, and you can’t see the writing underneath the glued piece. Usually, this is a form of editing. Leave the glued piece as is and simply scan.
Fragile Documents and Bound Volumes
- As mentioned above, scanning historical archival and manuscript collections is very different than scanning contemporary material.Your first concern is to handle the materials with care and maintain the order of the collection. Speed, while important, is not our only objective. If you handle materials that are brittle and breaking, please be extra careful not to further damage the documents. Be particularly careful with bound volumes– rare and fragile bound volumes should be scanned with the book cradle and never flattened with force. Documents should never be creased or forced with your hand or other device in order to get a better scanned image.
- If at any time you feel uncomfortable handling an item or are concerned about getting a good image, please consult with the archivist, digital assets manager, or one of the supervisors.
Flagging Items for Conservation
- If you find items within the collections that you feel are in URGENT or CRITICAL need of conservation, please bring this to the attention of the archivist or a supervisor, and report it in your post-scanning worksheet.
Mylar Encased Documents
- You may encounter mylar encased documents within collections. If possible, try to capture the image with the mylar. If this is not possible and there is too much glare, carefully remove the mylar.
Matted Documents and Photographs
- You will encounter professionally matted and mounted documents and photographs. As many of the mats were done as part of a conservation project, do not remove the mat. In most cases, you will have to scan the front of the photograph with the mat attached. However, be sure to check if the mat covers important notations or titles and be creative in trying to move the mat out of the way to capture all of the photograph, including the reverse if it includes any written information.
- Always scan the verso of un-matted photographs if there is any writing at all, even if all versos contain the same information. Do not scan blank versos of photographs.
- Do not scan more than one photograph in each shot.
Interleaving Materials
- Most of the Processing Archivists interleave acidic or fragile materials with blank acid free paper for preservation reasons. Sometimes this is done after scanning, but often you will be scanning collections that have a significant amount of interleaving. Please do not scan the blank paper and be very careful to put the interleaving materials neatly back in the proper place.
Blank Pages
- Do not scan blank pages, documents, or interleaving papers. Do not scan the reverse of documents or photograph with no handwriting. DO scan any document, page, or reverse if there is handwriting or printing with content.
Negatives, Slides, and Transparencies
- Generally, we do not scan negatives, slides, or transparencies as part of the Fully Digitized Collections. If the processing archivist desires these photographic materials scanned, notify the digital assets manager.
Document Size
- Documents measuring 9.5 x 15 inches or less should be scanned at 600 ppi. Documents measuring between 9.5 x 15 inches to 18.5 x 27.5 inches should be scanned at 300 ppi.
Digitizing Entire Collections: Chapter 5, Reviewing and Finalizing Fully Digitized Collections
Digitizing Entire Collections: Chapter 5, Reviewing and Finalizing Fully Digitized Collections AikensBThe scanning technician will notify the processing archivist when she has finished scanning the collection. Notify the digital assets manager that scanning is complete so that she can transfer and process the digital files and record statistics. She will notify you when the site is ready for your review and approval.
Complete the Collections Online Final Review Checklist, which includes checklists and a review table - noting poor images, programming and display issues, scanning retakes, etc. (See PART D of this document for the review worksheet.)
Confirm that the collection has a representative image in the DCD collection record and that there aren’t any display issues with the image on Collections Online. You may decide to choose a more appropriate representative image from the collection record in the DCD.
Review the digitization note (first paragraph on Collections Online) in the DCD collection record. Certain content such as the number of images and dates is are automated. If this information is not showing up, try checking out/in the finding aid again and this information should appear. Change the default statement from “The papers have been scanned in their entirety...” if large portions of the collection have not been scanned to “The bulk of this collection has been scanned....” You must log into the DCD and manually change the digitization note if needed. Also note and change the default collection title if appropriate.
While reviewing the collection’s website use the review table on the second page of the attached checklist to list every issue that needs to be fixed by you, the scanning technician, or digital assets manager (print out additional tables as needed).
Review both tabs of online display to ensure that every series is displayed and has a series representative image. If an image needs to be changed to an image more representative of the series, go to Collections Online Workflow > Work with Image Files > Post Processing: Edits & Touchups > Manually Set Series Representative Images, and select a new image.
Review the display of administrative information and container listing for each series. Check for typos and general display issues. Compare the container list that is displayed with the container list in the EAD finding aid to ensure that all folder headings, OVs, lists, and hierarchies are displaying correctly.
Click on each folder link to view images (note if links are missing), and do a quick review of the display of all items within the folder. Be sure to scan through and view the first to last image and note if there are missing images, images out of order, in the wrong folders, etc. Also note any individual images that may be difficult to view due to the size of the image, illegible text, contrast, scanning mistakes, etc.
When listing errors in the review table, indicate the series/box/folder. Indicate the type of problem and who it is routed to:scanning (archivist works directly with scanning tech. for rescans) if images were skipped that should have been scanned, need to be rescanned, or were scanned out of order; XML (archivist) if you need to make a correction in the finding aid; or programming(digital asset manager) if it is a display error that can’t be fixed in XML. Describe the error in enough detail that the person fixing it will understand.
Fix all of the XML problems and indicate on the Checklist that you have uploaded the final version of the finding aid.
It is your responsibility to follow up with the staff who are fixing errors and indicate on the checklist when errors that have been fixed. Continue to follow up regularly until problems are fixed.
Review the list of errors to ensure that everything has been fixed and record the date that you give the Collections Online site your final approval. Check off that the collection has been reviewed and approved in the online workflow checklist. Email the chief of collections processing that the collection is ready for final cataloging and deployment to the public website.
The chief of collections processing will notify the cataloger that the collection is ready for final cataloging.
The chief of collections processing will review the home page, and make any final revisions if needed. She will review the final catalog record to ensure that it syncs with the new finding aid and deploy the collection to the website, and make staff announcements.
Keep the Review Checklist and Review Table with the other sections of the Scanning Workflow Form and route to the Information Resources Manager.
Do not remove notes and scanning instructions from the collection. Check interleaving and add if needed.
Do one final physical inspection to ensure collection is in good order. Notify the registrar that the collection is ready for barcoding and shelving.
Digitizing Entire Collections: Chapter 6, Scanning Representative Images from Processed Collections
Digitizing Entire Collections: Chapter 6, Scanning Representative Images from Processed Collections AikensBWhen a finding aid has been completed, please select at least one “representative image” for the collection and optionally 5-10 additional documents for item level scanning. This is requested for all final processed collections, even those that are scheduled for complete digitization. These scans will be individually cataloged for the DCD and the website’s Image Gallery interface. The only exceptions are materials that are access or publication restricted. See steps below for guidance.
The representative image will eventually be incorporated on the main page of each finding aid, and may also be used in associated website news or collection pages, a newsletter, Director’s report, etc.
The archivist decides what best represents the collection. In general, a photograph of the creator will be used when available for personal papers. A likely choice for a representative image for gallery records would be a photograph of an exhibition installation, gallery owner, or the cover of a catalog for a prominent or important exhibit. The representative image must come from the collection the finding aid represents. If existing DCD images will suffice and are truly representative of the collection, then simply go into the DCD and select one as the representative image.
Optionally, 5-10 additional images may be chosen that reflect either a cross-section of materials or a special focus. The archivist may decide what and how many to include. More than ten images are an option if the items are significant. Scanning documents that are in poor condition for purposes of preservation are also encouraged at this time.
Removal Notice Workflow
- Before removal:
On AAA’s intranet site, verify that item has not been scanned.
If web display is desired, verify that no publication or access restrictions apply to the document.
- Complete the Removal Notice form in the DCD.
On the first tab of the form, choose the purpose of the removal– Archivist/Processing Requirement.
On the second tab, choose the collection from which you are removing items. A list of items from that collection that have already been scanned will appear. If the item has never been digitized, select “New Item”.
Enter descriptive information about the item. If the collection has just been processed, location information may not be available. Enter the box and folder information into the internal note. The following fields are mandatory: title, general format, specific format, extent #, extent type, dimensions, display date, search date, item restriction status, item copyright status, and cataloging approval. (See S:/Robin/DCD Policies.doc for detailed guidance.)
On the digitization instructions tab, record any special requests for scanning.
On the last tab select the date the item should be returned to you, typically three weeks after removal, and click finish. Print three copies of the completed online removal notice.
For the item selected by the processing archivist to be the representative image, enter the statement into the internal note for the cataloger: Set as representative image.
- Remove physical document from collection. Photocopy the document(s) removed and staple the photocopy to the removal notice form. Place one set in the appropriate folder exactly marking the location of the original document. It should be upright so it is obvious when the box lid is opened. The second set will go in a folder with the item. The third set is for your records.
- Bring the documents to the digital imaging technician for scanning. Record the item numbers and due date in the digital imaging technician’s notebook when you drop off the items. Place folder in vertical sorters. The digital imaging technician will create a master tif file and create and send derivatives to the web for internal review. He will return the documents to the remover of the item.
- Processor will review the images. Contact the digital imaging technician or the digital asset manager with data concerns.
- Replace the document(s) in the collection and take out removal notices. Place those removal notices in the registrar’s INACTIVE holder. The registrar will compare the removal notice(s) in the INACTIVE holder to those created online and mark items as returned in the DCD.
- The item cataloger will review and finalize the cataloging submitted in the removal notice.
- The item cataloger will refine cataloging in the DCD. Working from the digital file, the item cataloger will review and finalize the cataloging submitted in the removal notice. Also, the image designated in the internal note as the collection representative image will be assigned.
- The processing archivist will check the homepage of the finding aid or Collections Online homepage to ensure that the representative image and any links to an image gallery are there.